Pages, templates and publishing in the Site Builder
How to add and manage pages, set page names, addresses and search details, start from a template, restore an older version, and understand exactly what goes live when you click Publish.
Where to find it
Website (left sidebar) → Pages tab, and the top bar (Publish, Change Template, History)
This page explains how pages, templates and publishing work in the Site Builder. The most important thing to know: what you see while you build is a draft, and visitors only see what you have published.
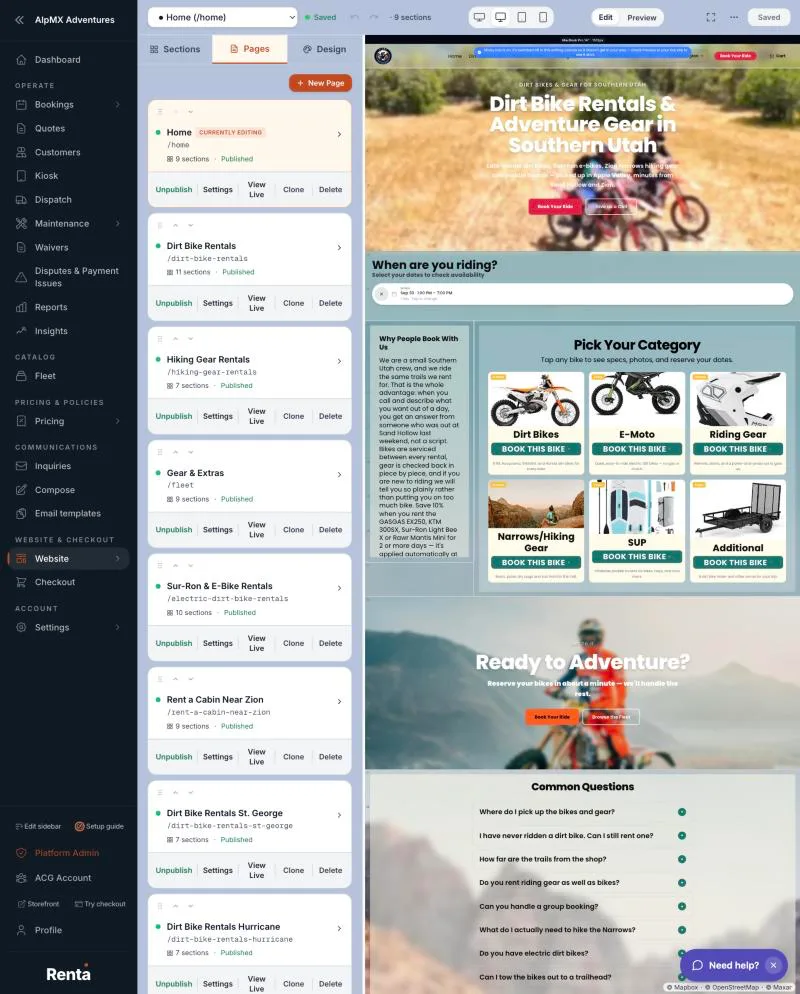 The Pages tab showing page cards with Published and Draft status and the Publish, Settings, View Live, Clone and Delete buttons
Draft versus published
- Your sections and layout save automatically to a draft. They go live only when you click Publish in the top bar. Publishing works one page at a time: it publishes the page you have open, plus any pending colors and fonts (these change every page).
- Your colors and fonts (the Design tab) are also a draft. They go live when you publish any page, and they then apply to every page.
- A few things go live the moment you save them, without Publish: a page's name, address, search details and Show in navbar setting, the Publish or Unpublish button in the Pages list, and deleting or reordering pages. A newly created page is saved at once but stays unpublished.
- Your navigation bar and footer are read from your published pages. A change to them waits for that page's Publish.
The Publish button
The top bar's Publish button tells you where you stand:
- Publish recent changes (orange): you have unpublished changes. This also lights up for a change to colors and fonts alone.
- Saved (grey, not clickable): nothing is waiting to be published.
- Publishing... while it works.
Click it and a box asks `Publish "Page name"?`, saying "It will be visible on your live site immediately." If colors and fonts are pending it adds that they will go live on every page too. Click Publish to confirm, and you will see "Published successfully!"
If the page is empty but a live version exists, you are warned "Publish an empty page?" and told that publishing will erase your live page for visitors. Only confirm with Publish empty page if you mean it.
Careful: Saved appears in two places. The little status beside the page name means your draft is saved. The grey Saved button means nothing is waiting to be published. Neither one means a page is live. A page's live or not-live state is shown by its filled or empty dot in the page drop-down and by Published or Draft on its card in the Pages tab. Those show whether the page is switched on, not whether it has pending edits.
The Pages tab
Open the Pages tab in the left panel. Click New Page to add one, and click any card to open that page for editing.
New Page
1. Click New Page. 2. Enter a Title (for example "About Us") and a URL (for example "about-us"). The address is tidied up for you and limited to 64 characters. 3. Click Create. The new page starts unpublished and empty, and the editor switches to it.
Some addresses are reserved and cannot be used: home, book, rental, pay, waiver, admin, api, checkout, 404, 500, sitemap and robots. You will see "This URL is reserved and cannot be used for a page." Your home page is the page with the address "home". There is no "make this the home page" button.
Each page card
A card shows a status dot, Published or Draft, the number of sections, and Currently editing on the page you have open. Drag its grip (or use Move up and Move down) to reorder pages. The new order is saved at once and sets the order of links in your navigation bar.
Along the bottom of a card:
- Publish or Unpublish — asks you to confirm, then switches the page on or off for visitors. This only flips the on/off switch. It does not publish your latest edits. To publish edits, open the page and use the top bar's Publish. This matters most for a new page, a cloned page or a page made from a template, where Publish in this list would switch on an empty page.
- Settings — opens the page settings below.
- View Live (published pages) or Preview (not published) — opens the page in a new tab. View Live shows the published version, never your draft.
- Clone — makes a copy named "(name) (Copy)", with its own address ending in -copy. It copies the sections, search title and description. The copy stays unpublished and you stay where you are.
- Delete — asks "Confirm?" and then deletes the page for good. Delete is hidden for system pages.
Page settings
Click Settings on a card:
- Page name (80 characters) — shown in the Pages list and as the link label in your navbar. If it still matched the old title's address, the address updates with it. Changing an address does not create a redirect from the old one.
- Page URL.
- Meta title (70 characters) and Meta description (160 characters) — what Google shows in search results.
- Canonical URL (optional) and Focus keywords (optional).
- Show in navbar — tick to list the page in your navigation bar. New pages start ticked.
- Save and Cancel. A note says these "Saves and goes live immediately — unlike page content below, these don't wait for Publish."
Starting from a template
Click Change Template in the top bar (or inside the … menu on a smaller screen). Whenever you open the Site Builder and your Home page is empty, the gallery opens by itself.
1. Choose a card: Powersports, Watercraft, Bikes, Camping & Outdoors or General Equipment. 2. Click Apply Template, then confirm with Yes, Apply Template. The box warns that your current Home page content will be replaced, and lists any of your Fleet, About or Contact pages it will overwrite ("Their current content will be lost"). 3. Optionally tick Also replace my brand colors and fonts with the template's defaults. It is off by default and only changes the draft.
What happens: your Home page is always replaced. Fleet, About and Contact pages you already made are replaced, and any that do not exist are created. Custom pages you made are left alone. Everything lands as a draft, so nothing goes live until you publish. You see "Template applied to Home, Fleet, About & Contact — customize each page, then Publish." Undo does not reverse a template.
Below the cards, Or use our recommended layout (the default) applies the default layout to Home, Fleet, About and Contact without a confirmation, overwriting the drafts of those pages that already exist. Use it carefully.
Version history
Every time you publish over a page that was already live, Renta saves a copy of the version it replaced. Open History (called Version History in the … menu) to see them: a date and time and the number of sections, newest first, up to the last 30 for that page. With none yet it says "No history yet — a snapshot is saved here each time you publish over an already-published page."
To go back, click Restore beside a version, then Yes, restore in the box "Replace your current draft?" You will see "Restored into your draft — publish when you're ready." Restoring only loads the old version into your draft. It does not go live until you publish. Colors and fonts are not part of version history.
The "classic layout" banner
If a page was built with Renta's older layout, a banner says "This page uses the classic layout" and offers Upgrade to Grid, which converts its sections into grid sections (the published page does not change until you publish) or Dismiss (hides it for this visit).
Example
You add a "Group Rentals" page. Click New Page, enter the title "Group Rentals", build it on the canvas, and the top bar button turns orange, Publish recent changes. Click it and confirm. Your page is live and it appears in the navbar because Show in navbar was ticked.
Good to know
- Colors and fonts apply to every page, and they go live with whichever page you publish next.
- A page that is switched off has an empty dot in the page drop-down, and on its card in the Pages tab it shows an amber dot and Draft. Switch it on from the Pages tab with Publish.
- To use your own web address, see Connecting your own domain name.
Related
Still stuck? Ask the chat.